When it comes to knitting and crocheting, getting the right size and look is super important for a successful project, and gauge swatches are key to making that happen. You either love them or hate them, but gauge swatches are a handy tool when kicking off your next knitting or crochet project! Taking some time to whip up a gauge swatch means your finished piece will fit just right and look the way you want, helping you avoid any stress later on.
For simplicity’s sake, I’m going to focus on crochet in this article, but this applies to knitting gauge swatches too.
If you’re new to crochet and need to know where to start with hooks, yarn, and all of that then check out this post first!
What are Gauge Swatches?
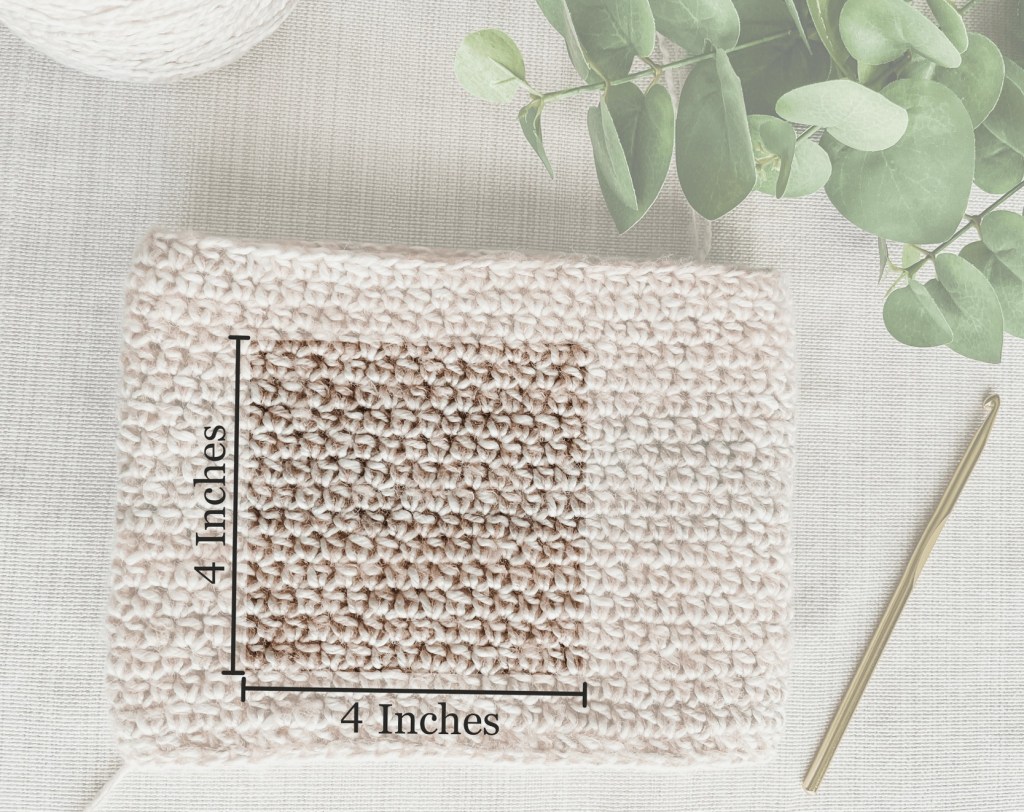
Gauge swatches are 5″ by 5″ (or larger) test pieces that allow you to measure the number of stitches and rows within a 4” by 4” area. By comparing the gauge of the swatch to the gauge specified in a pattern, you can be sure that your finished project will match the pattern’s dimensions. Usually when doing a gauge swatch, you’re comparing both your tension (whether you crochet tighter or more loosely) and the yarn you chose with the gauge given in the pattern you’re using and trying to get them to match.
How to do a Gauge Swatch
To create a gauge swatch, follow these steps:
- Choose the yarn and crochet hook size specified in the pattern.
- Work up a test piece that measures at least 5″ by 5″.
- Make sure that when you’re swatching, you use the specified stitch in the pattern. Often, the pattern will specify which stitch to use for the gauge swatch.
- Tip: To get the number of stitches you need across for a 5″ swatch, take the number of stitches per 4″ across in the gauge on the pattern and multiply by 1.25. If you want a 6” swatch, multiply by 1.5.
- After completing the swatch, lay it flat and use a ruler to count the number of stitches and rows within a 4″ by 4″ area.
- Compare these measurements to the gauge specified in the pattern.
- If your stitch count doesn’t match the pattern’s gauge, adjust your hook size and create a new swatch.
- Repeat this process until you achieve the correct gauge for your project.
Remember, gauge swatches are essential for making sure your finished project matches the pattern’s dimensions. If you don’t match the gauge, your final piece may be the wrong size, and the drape and texture of the fabric could be off. Adjusting your gauge gives you a better chance of your project coming out the way you expect.
What happens if my gauge doesn’t match the pattern’s?
When the stitch count in your gauge swatch doesn’t match the pattern’s gauge, it’s best to adjust your hook size and create a new swatch. If you don’t and continue on with your project, it can significantly impact the overall size and fit of the finished piece.
You may need to make adjustments to your hook size to make sure that the final project dimensions match the pattern’s. The drape and texture of the fabric can also be affected if your gauge is off: if your gauge is larger, the fabric will be more drapey. If your gauge is smaller, the fabric will be stiffer.
How do I fix my gauge?
The general rule of thumb for adjusting hook size to match gauge is: If you have more stitches per inch than the gauge you’re trying to match, go up a hook size. If you have fewer stitches per inch than the intended gauge, go down a hook size.
Once you adjust your hook size, make another gauge swatch and see if it matches the project gauge now.
| Problem | Size Adjustment |
| Not enough stitches or rows | Go down a hook size |
| Too many stitches or rows | Go up a hook size |
Gauge swatches aren’t super glamorous, but they really are helpful. You’ve got to ask yourself: “Do I care about the size this will end up being?”. If the answer is yes, then do a gauge swatch. If the answer is no, which is usually is for me for scarves and blankets, then just go for it and if it needs to be longer/shorter, adjust the amount of rows you do accordingly.
A Lazy Girl’s Swatching Tips
I’m going to preface this with a disclaimer: This is not the by-the-book way to do things that I’ve described above, which you should do if you’re just starting to crochet or knit. This is just how I do it and it has worked for the projects I’ve done.
Tip #1: If your swatch has the right amount of stitches across, but is a few rows too short per the pattern’s gauge, it’s fiiiine. Most patterns will say to work the pattern until it’s X” long when doing the actual project, so you just need to match that. The more important part is that you have the width right so that if it’s a wearable, it will actually fit you.
If you’re using superwash merino wool yarn, especially Malabrigo Rios yarn, it will most likely grow when you wash and block it, so there’s some wiggle room in there for length. In my experience, it grows more with knitting rather than crochet, so keep that in mind.
Info: When yarn “grows”, it’s the fibers in the yarn relaxing, which causes the crocheted or knitted fabric to end up a little bigger overall.
Tip #2: After finishing the swatch and figuring out the right size hook to use, don’t cut and secure the swatch. Leave it alone and put a stitch marker in the working loop to secure it. Then start the project with a new ball of yarn. That way you have the gauge swatch to reference if something goes wrong and if you’re playing yarn chicken, you can unravel the swatch to have a little more yarn to use and less ends to weave in.
Tip #3: When making something that doesn’t have to be a specific size, like a blanket or scarf, you don’t really need to swatch as long as you measure the width after you’ve done a couple of rows and are okay with it. Then you can just make it as long as you want.
Tip #4: Blocking swatches is for suckers. Unless you really need to make sure that yarn is going to grow (or not grow), in which case: fair enough.
Tip #5: Not sure about color combinations? Start the swatch with one combination, then change out the yarn to another color combination. Continue the swatch with that instead of having to start a whole new one. It’s better to have a super long swatch than to have to do two.